How to Secure a GitHub Action with GitHub Environment Secrets
Info
In this post, I'll describe how to secure a GitHub Action with environment secrets. This is a continuation of the example I used in How I Schedule Blog Posts with GitHub Actions and Netlify.
In today's era of open-source collaboration, ensuring the security of sensitive data, such as API keys, passwords, and tokens, has become a top priority for developers.
GitHub, a central hub for software development, has taken significant strides towards this goal with features like Environment Secrets.
These allow developers to store and manage confidential data securely within the GitHub ecosystem, while seamlessly integrating with GitHub Actions.
A Quick Intro to GitHub Actions
GitHub Actions enable the automation of software workflows directly in your GitHub repository.
They have become increasingly popular for tasks like Continuous Integration (CI) and Continuous Deployment (CD), and more.
However, these workflows often require access to sensitive information, and that's where environment secrets come into play.
In this blog post, we'll dive deep into the world of GitHub Actions and Environment Secrets.
We'll explore what they are, how to configure them, and how they enhance the security of your projects.
Moreover, we'll learn how, by using environment secrets, you as a repository contributor can secure your secrets in GitHub and seamlessly use them with Actions.
Join me as we unlock the potential of GitHub's security features and take one more step towards robust, secure software development practices.
Prerequisites: Setting the Stage for Secure GitHub Workflows
Before we delve into the details of environment secrets and how to use them with GitHub Actions, it's crucial to understand the prerequisites.
Ensuring that you meet these prerequisites will provide a smooth, seamless learning experience as we navigate the path of securing GitHub Actions with environment secrets.
- GitHub Account: As our journey revolves around GitHub and its features, it is essential to have an active GitHub account. If you don't have one already, you can sign up for free here.
- Basic Understanding of GitHub Actions: Having a fundamental understanding of GitHub Actions and workflows will be beneficial. If you're new to GitHub Actions, consider reading through GitHub's introduction to GitHub Actions or my post on How I Schedule Blog Posts with GitHub Actions and Netlify.
- A GitHub Repository: You should have a repository where you can practice configuring and using environment secrets. It can be an existing project where you are already using GitHub Actions, or a new repository created specifically for this purpose.
- Sensitive Data: While you don't need actual sensitive data for learning purposes, it will be useful to have some mock data to use as placeholders for the real thing. This could be a fake API key, token, or password. In this example, I'll be using a Netlify Build Hook.
Once you're confident you meet these prerequisites, you're ready to embark on the journey of enhancing the security of your GitHub workflows with environment secrets. Let's dive in!
Objective: Securing GitHub Actions with Environment Secrets
The main aim of this blog post is to equip you with the knowledge and practical skills needed to secure your secrets within a GitHub repository and use them seamlessly with GitHub Actions.
Specifically, by the end of this guide, you'll be able to:
- Understand Environment Secrets: We'll demystify what environment secrets are in GitHub, their benefits, and why they are an essential component for securing sensitive data in your repositories.
- Configure Environment Secrets: I'll guide you on how to correctly set up and manage environment secrets within your GitHub repository, demonstrating the process using an easy-to-follow, step-by-step approach.
- Use Environment Secrets with GitHub Actions: You'll learn how to reference these secrets within your GitHub Actions workflows. We'll cover how to securely pass secrets to actions, ensuring the confidentiality of your sensitive data while enabling the automation of your software development processes.
By the end of this guide, you'll have a solid understanding of GitHub environment secrets and practical experience in their configuration and usage, enhancing the security and reliability of your software workflows on GitHub. Let's get started!
Step-by-Step Instructions on Setting Up GitHub Actions Secrets
Now that we've set our objectives, let's dive into the process of configuring and using environment secrets within your GitHub Actions workflows. This guide will take you through each step, ensuring you're well-equipped to secure your sensitive data.
Add Secret
Step 1: Navigate to Your GitHub Repository
The first step is to navigate to the GitHub repository where you want to add the environment secrets. Remember, each GitHub repository has its separate space for secrets.
Step 2: Access the Repository Settings
Once you're in the repository, click on the Settings tab, located on the right side of the repository menu.
Step 3: Select the 'Secrets' Option
Within the settings tab, you'll see a sidebar menu on the left side. Here, you'll find the Secrets and variables option — click on it. This will open a flyout and you'll see Actions — click on it. This should take you to a page called Actions secrets and variables.
Step 4: Create An Environment
In order to access your secret in an Action for a repository, you need a new environment.
On the Actions secrets and variables page, click Manage environments. This will take you to a page called Environments. Now you need to create a new environment. Look for a New environment button — click on it.
Now you'll be prompted to add a new environment with a name field.
Some recommendations for naming your new environment:
- use all lowercase characters
- use
_in place of spaces - name the environment appropriately
I named my environment daily_build.
Now that you have a new environment, you should be on a page for conpiguring it.
Look for the heading Environment secrets and click the button below that says Add secret.
Create the secret by adding a name (I named mine BUILD_HOOK_ID).
Tips for Naming
When adding secrets, it's a good idea to use underscores (
_) to denote spacing. GitHub will automatically capitalize the casing of the name.
Paste the value (I pasted the id of the build hook without the URL), find the Add secret button — click on it.
Step 5: Use Environment variable in your GitHub Action
In this example, I'm using my scheduled cron job and updating it by replacing a hard coded Netlify build URL with a hard coded URL that interpolates the value for my build hook id.
Follow These Steps Exactly!
This is important: If you don't do all of these steps, you will probably encounter a failure in your GitHub Action.
Using secrets in an action is incredibly fickle, so don't skip this!
Required Properties For Using Environment Secrets
In order to use a secret you need the following defined in your Actions workflow YAML:
- environment - aproperty of build. If you don't add this, the action won't have access to the variable
- env - a property of the step.
- Variable name passed to
run- I usedBUILD_HOOK_ID. The important lesson here is that the property name is what's passed torun. - Secret as value of Variable name -
${{ secrets.<YOUR_VARIABLE_NAME> }}. This is pulling from the environment's secrets and setting the value for the variable.
- Variable name passed to
- run - a property of the step. This has the command you want to run. Notice that in my example I used
$BUILD_HOOK_ID. Using$tellsbashto interpolate the variable for the value. This is usingenv.BUILD_HOOK_IDset previously.
With all of those in mind, here's my YAML workflow file:
name: daily-build

on:
  schedule:
    - cron: "1 12 * * *"

jobs:
  build:
    runs-on: ubuntu-latest
	environment: daily_build
    steps:
      - name: trigger netlify build
	    env:
          BUILD_HOOK_ID: ${{ secrets.BUILD_HOOK_ID }}
        run: |
          curl -X POST -d '{}' "https://api.netlify.com/build_hooks/$BUILD_HOOK_ID"
Notice that I set environment, env.BUILD_HOOK_ID and used $BUILD_HOOK_ID in my curl.
Step 6: Run It
With GitHub Actions, if you have a scheduled build, it won't allow you to trigger it manually (despite what the docs say), so you'll have to wait on this one.
If you have set everything up correctly, if you click Actions in your repository, you should see All workflows and your workflow runs should look like this:

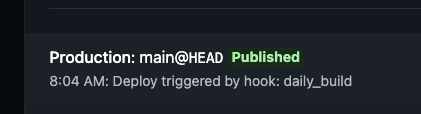
If you are following along with my Netlify example, from your Site overview under Production deploys, you should see a deploy that is Published that says Deploy triggered by hook: daily-build (your hook name will replace "daily-build") like this:
Wrapping Up Using Environment Secrets in GitHub Actions
We've taken an enlightening journey into the world of GitHub Actions and Environment Secrets.
We've explored their importance, dove into the process of setting them up, and learned how to use them to safeguard our sensitive data in GitHub workflows.
Environment Secrets, as we've seen, provide a robust method of securing confidential information within your GitHub repositories, protecting your data from unintentional exposure.
By integrating these secrets into your GitHub Actions workflows, you enable secure, automated processes that enhance not just the safety, but also the efficiency of your software development efforts.
Remember, the key to mastering this skill, like any other, is practice.
I encourage you to experiment with setting up environment secrets in your repositories and integrating them with various GitHub Actions workflows.
As you continue your journey with GitHub Actions and secrets management, always prioritize data security.
The practices you've learned today will serve as a stepping stone towards creating more secure, reliable, and efficient software workflows.
Stay curious, keep learning, and happy coding!